Actions are commands that change settings, navigate, control simulation, or otherwise manage the user interface. They are specified as part of the definition of a Button (Interface).
Run will run the model using the specified simulation speed. If the model is paused, it will resume the model; otherwise, it will start a new run. In presentation mode, or with a published model, if Stella Live is on, Run will stop it. If the model is already running, this command is inactive.
Run then Stella Live will run the model and then start Stella Live (more precisely leave it in Stella Live so the next input change will trigger a run). The run will animate, and the first Stella Live run will be a new run after the animated run. This is the same as the way the run button on the Run Toolbar works.
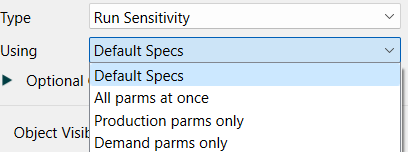
Run Sensitivity will run a sensitivity simulation. You can select which defined sensitivity specifications you want to use:
If you select Default Specs sensitivity will be run using the active Sensitivity Specs that are selected in the Sensitivity Specs Panel.
Run Optimization will run an optimization. Choose Default Specs to use the active Optimization Specs that are selected in the Optimization Specs panel, or one of the defined optimization specifications.
Pause will pause a running model. If the model isn't running, this command is inactive.
Resume will resume the running model (the same as Run). This command is only active when the model is paused.
Stop will stop the current run. This command is only active when a model is running or paused. This command isn't active when Stella Live is on.
Start Stella Live turns Stella Live on. Any changes made to inputs will cause a new simulation to occur. If the model is paused, this command will stop it.
Stop Stella Live turns Stella Live off. This command is only active when Stella Live has been started using the Start Stella Live action.
Simulate in Ballistic Mode will run the model to the end. If the model is paused, the simulation will continue from the paused time; otherwise, a new run will be started. Any simulation speed or pause interval set in the model will be ignored (simulation events will still cause a pause).
Advance Time in Ballistic Mode will run the model for the amount of time specified in Time, resuming or starting a new run the same as the previous action. Any simulation speed or pause interval set in the model will be ignored (simulation events will still cause a pause). This action isn't active in Stella Live.
Start New Run will create a new run and set it to the beginning. This is active except during the time that a run is executing. If Stella Live has been started, it will be stopped.
Restore All Devices restores both inputs and outputs, as described below. Only active when both restore inputs and restore outputs are active.
Restore All Inputs sets all variables that have been interactively controlled back to their model values (or their imported values, if you're using import sheets). This is inactive during a run, but active while paused and in Stella Live. Any continued simulation, whether new or resumed, will use the restored values. In Stella Live, this will trigger a new simulation, if anything is changed.
Restore All Outputs deletes all runs that haven't been explicitly saved, and clears graphs and tables of those results. In published models or Presentation mode, this will also stop Stella Live, if it's active.
Restore a Variable sets a specific variable back to the model value (or its imported value). This is inactive during a run, but active while paused and in Stella Live. Any continued simulation, whether new or resumed, will use the restored value. In Stella Live, this will trigger a new simulation, if anything is changed.
Import Now (Desktop Only) executes an import of the specified on demand link. The link has to be set up in the Import Data dialog box, and must be marked on demand (which means it must have the Set parameters behavior). When the user clicks on the button, the import will occur. This action is only taken on desktop software. If the model is published, nothing happens when an Import Now action is taken.
Export Now (Desktop Only) executes an export of the specified on demand link. The link has to be set up in the Export Data dialog box, and must be marked on demand. When the user clicks on the button, the export will occur. This action is only taken on desktop software. If the model is published, nothing happens when an Export Now action is taken..
Enable/Disable Import Link (Desktop Only) changes the enabled state of an import link. The link has to be set up in the Import Data dialog box, and must be marked dynamics. When the user clicks on the button, state will be set to that specified. If the model is published, nothing happens when this action is taken..
Import Data imports the content of a file. You do not need to set up import links in advance to use this. The imported values will be used as interactive controls (this is different from the Import Data dialog which treats imported values as a different class of control).
You can use this dialog to import dimension array labels, time varying data, or constant and graphicals. The software will automatically detect which type you are trying to import. The formats for these files are the same as those described in Creating Import and Export Files
Note Importing from user provided files will increase the published sim size. You can import the same variables you can on the desktop. (Prior to Version 3.6.1 you could only import variables in graphs, tables or input objects).
Note Import Data creates a temporary control for the imported value, it will never change a model equation, and will always be reset by restoring input or all devices.
Note If the first row or column begins with "Time" or the units of measure for time, the import will try to read time varying values. Otherwise it will read constants and graphicals.
Note If instead of variable names, the import file contains dimension names with elements the file will be used to set the array dimension labels. You can only import labels, not definitions.
Note The import file must be a csv (or tab delimited) file. Excel files are not supported.
Note When importing from files you will need to change to Edit mode then enter Presentation mode again if you make any changes to the files.
Import Run imports the content of a file as a run. The run will, by default, be given the name of the file, but the user can change this in the Data Manager(Interface). The imported run will be displayed in graphs, tables, and other output objects just like any other run. Normally the loaded run will appear last in comparative tables and graphs and will be used for non comparative tables and graphs as well as other output devices. In Stella Live, however, the run will appear just before the current run which will continue to take inputs from the user and display the results.
Export Data will export the results of the current run for the variables specified.
The user will be queried for a file to save the results to (a csv file). On the desktop, a file selection dialog will then open allowing the selection of a location to place the file. When published most browsers will simply download the file to the Downloads folder renaming as necessary to prevent conflicts. 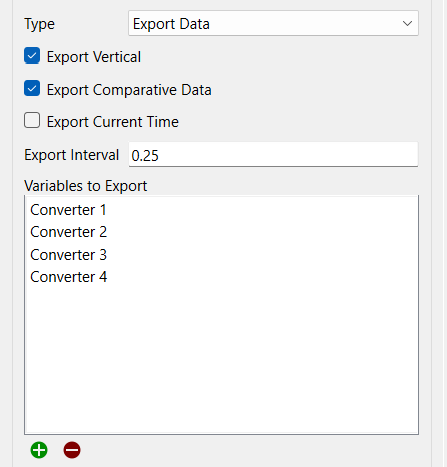
Note When exporting when paused, the values up to the save interval before the current time will be reported.
Note When exporting values from multiple runs all of the runs must have the same start time, stop time and save interval.
Export Parameter Values will export the parameters that have been set using controls (or that have been set through an import). Constant values will be exported as a number, while graphicals will be exported as x,y pairs. Resetting controls (with Reset After active) will be exported at their current value (they will not reset). Time varying controls that have been imported will not be saved. Additionally, you can specify variables that will always have their current value exported (as with Export data above) if you want to include a more complete set of parameters.
The user will be queried for a file to save the results to (a csv file). On the desktop, a file selection dialog will then open allowing the selection of a location to place the file. When published most browsers will simply download the file to the Downloads folder renaming as necessary to prevent conflicts.
Export Table Variables will export the variables appearing in the named table. Choose from the available tables which must be marked for export onTable Properties. The orientation of the table will be used in writing the file, but no other formatting information for the table will be used.
The user will be queried for a file to save the results to (a csv file). On the desktop, a file selection dialog will then open allowing the selection of a location to place the file. When published most browsers will simply download the file to the Downloads folder renaming as necessary to prevent conflicts.
Export Tagged Variables will export the variables with the selected tags.

Set Variable sets a variable to a specific value. That value will be retained until another action or control changes it, it is reset, or inputs are restored.
Reset to value specifies the value to reset the input to. It's only used if Reset After isn't set to Never. Typically, this is the same as the model equation, though it doesn't have to be.
Note You can select a module as the variables. If you do this and the model is set to be run by module, then setting it to a nonzero value will turn the module on, and a 0 value will turn it off. This change can be made before beginning a run, or while a run is paused. If the model is not set to be run by module the action will have no effect. The reset values are ignored for modules.
Navigate to Page switches to a different page on the interface.
Navigate to Story switches to a Story.
HTML Link lets you specify a web page to navigate to. The web page will open in a new browser window or tab, depending on the way a user has set up their browsing preferences. Note that, in the publication window, these links won't be displayed, as there's only a single window or tab allowed. You'll need to open the model in a web browser to see the behavior. In Explore or Presentation mode, clicking on a link will open it in your default web browser.
Note While it is possible to use local file references as links, these will not work unless the file is present on the computer of the person using the model or published interface.
Multiplayer Actions
The following button actions are applicable only for multiplayer games. When used outside the context of a multiplayer game, Ready to Advance is the same as Advance Time in Ballistic Mode, with advancement time set to 1. Ready to Start is the same as New Run. The two cancel buttons have no effect.
Note When used outside the context of a multiplayer game, Ready to Advance is the same as Advance Time in Ballistic Mode, with advancement time set to 1. Ready to Start is the same as New Run. The two cancel buttons have no effect.
Set Placeholder will set the current selection for a variable you select from Placeholders.

Use the
button to select the placeholder you want to set the value for. Once you have selected variable, the dropdown for Value will list the possible selections for the placeholder. Used in this way it is possible to change the values displayed in graphs and the variables to which input controls are attached.
Set Wildcard will set the current element on a dimension you select and will be applied to any variables specified using Wildcards.
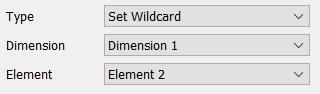
Click on the Dimension dropdown to select which dimension you want this to change. All of the dimensions in the model are listed in the dropdown.
Select the Element you want to set for the selected dimension. Now anything specified using a wildcard as in var[?] where var is arrayed by Dimension 1 will be as if var[Element 2] had been specified.
Set Run Name will set the run name to the one you specify. It you leave the name blank, it will open a dialog on the interface for the user to rename the most recent run. This can be helpful when you have comparative graphs and want the user to be able to specify the meaning of a run.
Note Runs do not persist on published interfaces so this action only effects the current session for the user.