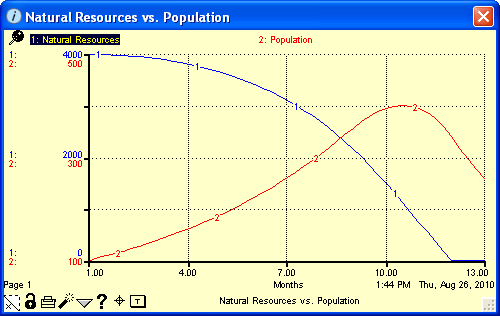
Use graphs pads to plot data generated by model simulations. The software supports three basic types of graphs: time series plots (X, Y, Z over time, as shown in the example below), scatter plots (X vs. Y), and bar graphs.
Regardless of the graph type, you can choose to plot the output from a single simulation run, or to display a comparative plot, where the results from multiple simulation runs appear on the same graph.
You define a graph by selecting the type of graph you want to create, the entities whose values you want to include in the graph, and then specifying the scale for each entity. You can also select options to customize the display of the graph, including whether the graph displays a grid in the background and whether it draws curves with thick or thin lines. You can create as many pages in the graph pad as you want, and define a new graph on each page of the pad.
You can place graph pads on the Interface, Map, and Model layers.
After you define the graph pad, model users can view the plot in the Graph Pad window.
 .
.Click the diagram to place the graph pad.
The Graph Pad window opens and displays an undefined graph.

To define one or more graphs for the pad, double-click the Graph Pad window, or right-click the window and then choose Open from the menu that appears.
The Define Graph dialog box opens.
Use the options in the Define Graph dialog box to define one or more graphs.
For more information about defining graphs, see To define a graph (below).
For information about placing, naming, turning pages in, and other actions involving graph pads, see Working with pads.
Select the type of graph you want to create: Time Series, Scatter, or Bar
If you select Sketchable as the graph type, see To define a sketchable graph.
The "Allowable" list in the upper-left corner of the dialog box displays a list of all the entities in the model.
Select the entities that you want to graph on this page of the graph pad.
Tip: You can also add entities to a graph by selecting them on the model diagram and then dragging them onto the graph pad, or by dragging them from the Find palette.
If you selected an arrayed entity, the Choose Subscript dialog box opens so that you can select which elements in the array to graph. To graph all elements in a dimension, select the * in the list of elements; otherwise, select the specific element to graph for each dimension.
Note: If you select to graph all elements in a dimension, the graph will display the first five elements, regardless of the number of elements in the dimension. In this case, you will probably want to select the specific elements to graph in the Choose Subscript dialog box.
To create another page so that you can display a second graph on the graph pad, click the New button.

Then repeat steps 2 - 4 to define the graph for the second page. For more information on creating and moving between pages, see Define Graph dialog box.
When you are finished defining graphs for the graph pad, click OK.
The graph pad displays the last graph you displayed in the Define Graph dialog box.
You can now pin/unpin the graph pad, turn pages in the graph pad, or move, resize, or rename it. For more information, see Working with pads.
Note: If the model has already been run (and the database file that contains the model data exists in the proper location on your computer), the graph displays the curves for data generated in the last run.
A sketchable graph allows model users to "sketch out" their goal or expectation of the performance for a single entity against the entity's actual performance over a simulation run.
When you create a sketchable graph, the graph displays two curves: the actual performance for the entity (shown in the following example as the blue curve "1"), along with the user-created sketch of the curve for the entity (shown as the red curve "2").
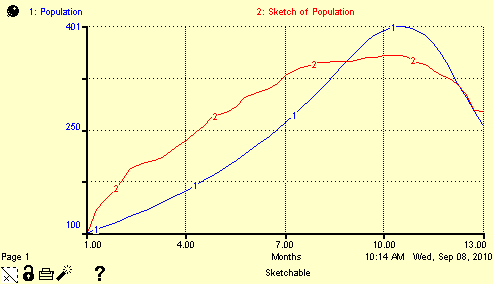
You and your model users can now create the sketch by clicking inside the graph and dragging to draw the desired curve. When the model simulation runs, the actual curve appears on the same graph along with the sketch.
Tip: If you use sketchable graphs, you should provide your model users with instructions for using them. You can use an information button, a text box, a sound, or even the Graph Pad window's documentation feature ( ) to provide the user with instructions.
You can provide documentation for each page in the graph pad to explain the purpose of a graph or to provide more information to your model's users.
Click at the bottom of the graph pad.
The Pad Page Documentation dialog box opens and displays the existing documentation for the page (if any).
Note: If you have defined a comparative graph and have generated output using the software's sensitivity analysis feature, clicking the button opens a journal of the most recent sensitivity setup in the Sensitivity Setup window. For more information about using sensitive analysis, see Performing sensitivity analysis.
You can set the scale for any entity included a graph. The scale appears on the Y-axis, in the same color that is assigned to the entity and its curve. For more information about how the scale is displayed on the graph pad, see Graph Pad window.
Tip: You can also set the global scale for any entity in the model by using the Scales and Ranges panel.
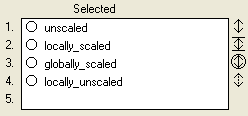
For any graphed entity, you can choose to set either a local scale, which applies to the entity for the current graph pad page only, or a global scale, which applies to the entity on all graph pad pages in which it is included, unless it is overridden locally. The global scale also applies to the small graphs that appear when you hover the mouse pointer over an entity after a simulation run.
Note: If you do not set a scale, the software automatically sets one for you.
Click the symbol to the right of the entity one or more times to select the scaling option you want to use. Each time you click the symbol, a new option icon is displayed.
Note: If you have selected more than one entity, you only need to click the symbol for one of the selected entities to select the scale type for all of the selected entities.
Tip: You can also set the global scale for any entity in the model by using the Scales and Ranges panel.
To remove a scale that you've set, select the entity in the "Selected" list, click the scaling option icon until it returns to the original, two-headed arrow icon or to the dashed two-headed arrow (indicating globally scaled, but locally unscaled), and then click the De-Set button.
Tip: You can remove the scale for an entity directly in the Graph Pad window by using the dynamite tool. Select the dynamite tool  from the Interface, Map, or Model toolbar, and then click either the upper or lower scale value for the entity. If the entity had been globally scaled, it will become locally unscaled (that is, unscaled only for the current page).
If two or more entities are set on the same scale and are next to each other in the list of selected entities, using the dynamite tool will remove the scale from them one at a time. If you click the lower scale value, it will remove the scale from the last entity first. If you click the upper scale value, it will remove the scale from the first entity first.
You can perform logic tracing for an entity in a graph pad that has been created on the Interface layer.
Tip:
At the top of the graph, click the name of the entity for which you want to perform logic tracing.
The tracing button  appears in the lower-left of the graph pad.
Click the .
You are navigated to the Tracing tab and are then able to sequentially traverse through the inputs for the model entity by pressing the SPACE BAR.
 above the navigation tabs to exit from logic tracing.
Once one or more simulations have run, the graph pad displays a curve for the values of each included entity for the run. Although you can estimate entity values at-a-glance by looking at the graph, you can also see exact values for all entities at any point on the graph.
Click and hold the point on the graph for which you want to view specific values; or click and hold and then drag to anywhere in the graph (on the curve or off) to view the value for that point.
The values for each entity at the selected point appear on the graph. The Y-axis value for each included entity appear under the entity name along the top of the graph pad. The X-axis value for the point you selected appears at the bottom of the graph pad.
The default numerical precision for values in graphs is 0. Use this procedure to choose a different numerical precision for a selected entity in a time series graph.
At the top of the graph pad, double-click the name of the entity for which you want to set the precision format.
The Graph Variable Format dialog box opens.
Click OK.
The new values for the units of time along the Y-axis reflect the new precision. The new precision format is also visible when you view an exact value for the entity in the graph.
Notes: You can also set the precision for entities by right-clicking the entity's name at the top of the graph, choosing Precision from the menu that appears, and then choosing the precision format you want.
To set the precision for the unit of time used in the graph, see To set the precision format for the time unit in graphs.
The default numerical precision for the unit of time represented by the X-axis in a time series
Below the graph, double-click the name of the graph's unit of time (for example, "months" or "days").
The Graph Variable Format dialog box opens.
Click OK.
The new values for the units of time along the X-axis reflect the new precision.
Notes: You can also set the precision for the unit of time by right-clicking the unit of time's name below the graph, choosing Precision from the menu that appears, and then choosing the precision format you want.
To set the precision for the values displayed in the graph, see To set the precision format for numbers in graphs.
Use the Graph Pad window's navigation button ( ) to navigate to any entity included in a time series graph so that you can see the entity in the model's context on the Map or Model layer.
At the top of the graph pad, select the name of the entity to which you want to navigate.
The navigation button () appears in the lower-left of the graph pad.
Click the navigation button ().
If the graph is on the Interface layer, the software navigates to the Map layer and highlights the icon for the associated entity. If the graph is on the Map or Model layer, the software highlights the icon for the associated entity.
Note: If the graph pad is pinned on the Map or Model layer, it may obscure the highlighted entity. To allow model users to be able to navigate to entities in the graph, be sure to pin the graph pad so that it does not cover entities included in the graph.
 Tell me how
 button. The entity's name turns gray in the "Allowable" list.
 button.
 button.
 See Also