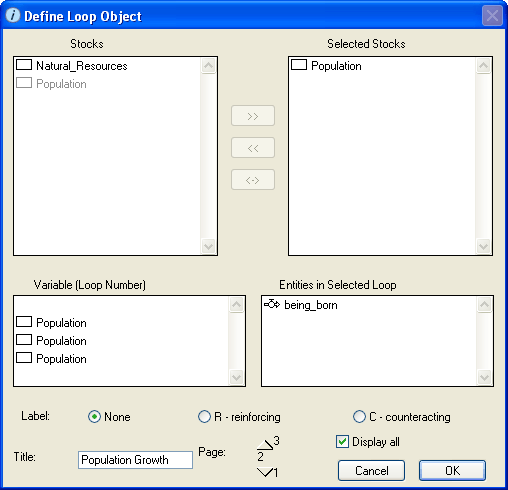
Use the Define Loop Object dialog box to view and edit the properties of the selected loop pad. To define a loop pad, you select the entities that you want to be included in the loop
To open the Loop Pad dialog box, double-click the open loop pad (or right-click the open loop pad and then choose Open from the menu that appears.

Displays a list of all stocks in the model. Use this list to select the stocks that you want to include in the loop you are defining.
Displays a list of the stocks you selected from the "Stocks" list. The selected stocks determine the list of loops that appear in the "Variable (Loop Number)" list, from which you will choose the loops to display on the loop pad.
Note: If there are two or more stocks in the "Selected Stocks" list, the available loops are those that pass through all of the stocks in the "Selected Stocks" list. If there are no loops common to all stocks, the "Variable (Loop Number)" list is empty.
Displays a list of the loops that "pass through" all of the stocks in the "Selected Stocks" list. Select the loop that you want to display on the loop pad.
When you select one of the loops in this list, the entities included within the loop are displayed in the "Entities in Selected Loop" list.
Note: If there are two or more stocks in the "Selected Stocks" list, the available loops are those that pass through all of the stocks in the "Selected Stocks" list. If there are no loops common to all stocks, the "Variable (Loop Number)" list is empty.
Displays the entities contained in the loop you selected in the "Variable (Loop Number)" list.
Note: To display the names of all of the entities in the loop on the loop pad, select the Display all check box.
Select the label you want to include for the loop on the loop pad:
Type a title for the current page of the loop pad.
For unpinned loop pads, the page title appears in the pad's title bar.
For pinned loop pads, the page title appears in parentheses at the top of the pad, along with the loop pad name and the page number.
Use the Page option to add more pages to the pad and to navigate between existing pages to define them. Each page can display a different loop. You can create as many pages for the pad as you want.
To create a new page, click the New button.

The number under the New button changes to the next sequential number. Use the rest of the options in the dialog box to define the loop you want to display on the new page.
To move to the next or previous page, click the up or down arrow buttons. The number between the arrows indicates the page you are currently viewing.

You can edit the contents of the currently displayed page.
Notes: If you create more than one page for the loop pad, model users can use the page turner in the pad's lower-left corner to move from page to page. For more information, see To turn the page in a pad.
You can delete any page from a pad by using the dynamite tool. For more information, see To delete pages or data from a pad.
Select this check box to display the names of all of the entities included in the loop on the loop pad. If you do not select this check box, only the stock names for the loop will appear on the loop pad.