 . You can use the paintbrush tool to color items on all model layers.
You can change the color of most model items, including building blocks, objects, backgrounds, as well as model output by using the paintbrush tool  . You can use the paintbrush tool to color items on all model layers.
To use the paintbrush tool, you first need to select the color that you want to apply. The following sections explain how to
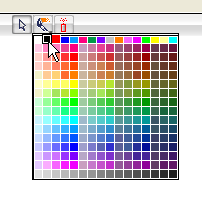
On the Interface, Map, Model, or Equation toolbar, click and hold the paintbrush tool  to reveal the color palette.

Release the mouse button.
The color palette disappears, the paintbrush tool displays the color you chose, and the mouse pointer changes to the paintbrush icon.
Tip: To select a color that is already used somewhere in the diagram, select the paintbrush tool, and then press CTRL+SHIFT (Windows) or Command-SHIFT (Mac). The paintbrush pointer changes to an eye dropper  . With the eye dropper, click the item whose color you want to copy. The paintbrush tool takes on the color of that item.
Click the part of the item that you want to color.
For a complete list of the items you can color and instructions for coloring each, see Paintbrush operations.
Note: The paintbrush tool remains selected until you click the item that you want to color. To deselect the paintbrush tool without coloring anything click the arrow tool  .
.
You can specify a default color for any building block or object for the current session.
ALT+click (Windows) or Option-click (Mac) the building block or object icon in the Interface, Map, or Model toolbar.
The toolbar icon changes to the color you selected. When you next place that building block or object on the diagram, it will use the new default color.
You can undock the color palette from the toolbar so that it remains visible for easy color selection. When you undock the color palette, you can place it anywhere in the iThink/STELLA window.
Click and hold the paintbrush tool  .
.
The color palette appears.
While holding the mouse button down, drag down or to the side until the pointer is off of the color palette.
A dotted outline of the palette follows the mouse pointer to indicate where the palette will appear when you release the mouse button.
Release the mouse button to place the palette where you want it.
Note: You can reposition the palette after you undock it by clicking and dragging the palette window's title bar.
You can create your own custom colors and have them appear in the color palette for future use.
Note: When you close the palette or the model, the new color is not saved to the palette; however, if you saved the new color as a custom color (by clicking the Add to Custom Colors button in the Change palette color dialog box) the color is saved and available in the future from the Change palette color dialog box.
ALT+click (Windows) or Option-click (Mac) the color in the palette that you want to change.
The Change palette color dialog box opens.
When you are finished, click OK.
The new color appears in the color palette and you can use it to color items in the model.