An assembly is simply a model with certain conventions on variable and unit names to make the process of using it in other models somewhat simpler. When Stella starts it looks at the custom assemblies directory specified in the Preferences Dialog. It will read all folders contained in that directory and any models contained in those folders - it will not read models contained in the custom assemblies folder itself. The assemblies will be named based on their folder names, and the model file name. You can nest folders if you want to create a hierarchical view. If there is no custom assemblies directory specified nothing will be read in beyond the Core Assemblies.
If you have folder names the conflict with the folder names of the Core Assemblies the word Custom will be put in front of the folder name. Otherwise folder names will be used as is.
While an assembly is just a model, there are some things that can be done to make its use easier. First make sure that there are no errors or units warnings. Since assemblies are intended to be used again and again, they should start as cleanly as possible.
The Core Assemblies use non-negative stocks and uniflows except when any requirement for being positive does not make sense (as in the flow for stock adjustment). When they are placed into a model, they will drop these attributes based on the current toolbar. Thus, if you are set up to use stocks that can go negative and biflows, the placed assemblies will have stocks that can go negative and biflows.
The converse is not true. A biflow will always be a biflow, and a stock that can go negative will always be able to go negative.
By using non-negative stocks and uniflows the assemblies you provide will fit most cleanly into the users model, based on their own preferences in model building.
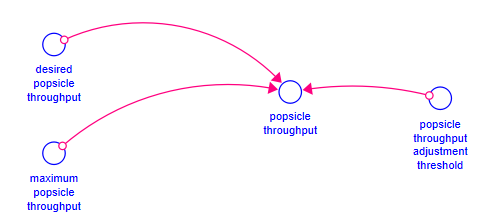
To prepare a model for use as an assembly it is helpful to mark variable names and units as customizable. For example, suppose you have a soft maximum formulation you would like to make an assembly:
Where throughput is measured in Stick/Day. To make this into an assembly we could replace popsicle with ${Object} and (in the units) Stick with ${Object Units}. Then when the assembly is added the user will be able to substitute names for both ${Object} and ${Object Units}. The units of measure of Day will automatically be replaced by the time units of the model the assembly is being placed into.
It is not necessary to use these special names - it is always possible to edit the names after an assembly has been added to a model in any case. They do, however, make it easier to see how the assembly might be customized, and allow the use of generic terms like Object to emphasize the range of possible uses.
Substitution names are not case sensitive. In the Core Assemblies the names used are normally capitalized to make the Assembly Customization Dialog easier to read.
Everything in an assembly can be replaced once the assembly is placed - but it is still helpful to call out the things that should likely be changed to make the assembly work within a model. Most of these should be constants (or test inputs) in the assembly, and can be replaced by either editing constant values, or by substituting another variable via either an equation, or replacement (see Deleting and Replacing Model Items and Data for details).
The Core Assemblies follow the convention of filling in the color on expected inputs with light green. This can be helpful for seeing what should be changed after adding an assembly, and you may want to follow the same convention in your custom assemblies.
In the Model Settings Properties Panel you can specify a description and keywords for the model. When used as an assembly these will be displayed when the user hovers over the assembly name and can be filtered on when selecting assemblies in the Assemblies Panel.
Providing examples of assembly use makes abstract concepts such as Object into concrete examples such as popsicle (to use the above example). This is very helpful for users trying to understand how an assembly might be used and what would need to be done to customize it for that use.
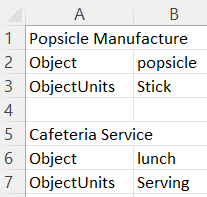
If you want to include examples of uses with your assembly add a text file with the same name as the assembly in the same directly. For example, the assembly SoftMaximum.stmx would have a tab delimited text file SoftMaxumum.txt containing
 or in a text editor
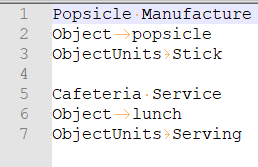
Here the file is shown being edited as a spreadsheet and in a text editor (where . denotes space and -> tab). The first line is the name of the example, this is followed by the substitution names and the example values for these names. The example values are separated from the substitution name by a tab and the different examples by a blank line. You can include as many examples as desired.
You can edit the models to be used as assemblies directly in the custom assembly directory you specify in the Preferences Dialog. To test the appearance as an assembly, simply close and reopen (or open a second copy) of Stella.
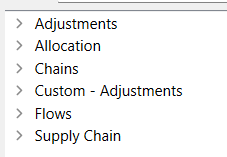
The custom assemblies will be interwoven with the core assemblies with repetitions marked custom. For example, if your custom assemblies include Adjustments, Allocation and Supply Chain, then the assemblies panel would contain:
Use a custom assembly exactly as you would use Core Assemblies as discussed in Assemblies.