The knob is useful for providing initial values for stocks. You can also use knobs to adjust values for constants. Knobs also work well for allowing model users to select from multiple, available scenarios by "dialing up" a scenario number at the start of the simulation
Unlike the slider, the knob cannot be adjusted during the course of a simulation. It is set prior to the start of a simulation and remains fixed throughout the simulation. Entities that contain equations or graphical functions cannot be assigned to a knob.
When you add a knob to the Interface layer of your model, you define it by associating it with an entity that has a constant value.
Notes: You can add a knob only on the Interface layer.
You can associate only one entity with each knob; once you've assigned an entity to a knob, you can't assign it to a second one.
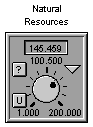
A defined knob displays the current value for the associated entity in the gray box at the top of the knob icon). It also indicates the minimum and maximum values to which the knob can be set, and the marks for each increment between those values.
Model users can change the value for the associated entity by turning the knob or by typing a value in the box at the top of the knob. They can also view the documentation (if any) for the associated entity, and navigate to the associated entity on the Model layer.
 tool.
tool.Click the diagram to place the knob.

To specify the properties for the knob, double-click the knob icon, or right-click the knob icon and then choose Open from the menu that appears.
The Knob dialog box opens.
Use the options in the Knob dialog box to define the properties of the knob. For more information, see To define a knob .
For more information about placing and editing knobs, see Working with objects.
Notes: You cannot resize a knob.
You can select to have the name of the associated entity displayed above the knob, but you cannot otherwise define or edit the knob's name.
Select the entity that you want to associate with the knob.
Tip: You can also add an entity to a knob by dragging it from the Find palette.
If you selected an arrayed entity, the Choose Subscript dialog box opens so that you can select which element in the array to control with the knob.
Entities that are associated with a knob display a small knob icon  to help remind you that the entity has been assigned to a knob and its value can be set at the Interface layer.
Double-click the knob icon (or right-click the knob icon and then choose Open from the menu that appears).
The Knob dialog box opens.
After a knob has been defined, you can use it to set the value for the associated entity. If you change the value with a knob, you can reset the entity to its original, constant value.
Click and drag the knob in the direction of the value you want. The value in the box at the top of the knob reflects the value as you set it.
–or–
Type the value you want in the box at the top of the knob.
When you change the value with the knob, a restore (U) button appears on the knob icon.
To restore the value to the original value, click the restore (U) button.
Tip: To restore all knobs in the model to their original values, use the Restore > Knobs command on the Interface and Model menus.
If the associated entity has documentation specified for it, a documentation (?) button appears at the bottom of the knob icon.
To view the documentation for the entity, click the documentation (?) button.
The documentation appears in a pop-up window.
If the knob was defined to include a navigation button (by selecting the Show Nav Arrow check box in the Knob dialog box), a navigation ( ) button appears on the knob icon.
To navigate to the associated entity on the Model layer, click the navigation () button.
The software displays the Model layer and highlights the entity icon for the associated entity.
 Tell me how
 button. The entity's name turns gray in the "Allowable" list.
 button.
 button.
 See Also