The slider input device allows model users to adjust constant values and to override equation logic (and graphical function relationships) that have numerical inputs.
When you add a slider to the Interface layer of your model, you define it by associating it with one or more model entities.
Notes: You can add a slider only on the Interface layer.
You are allowed only one slider per entity. If you've assigned an entity to a slider, it isn't available to assign to another slider.
If a slider is associated with a graphical function, that graphical function is not available to be associated with any other graphical input device (likewise, entities already associated with graphical input devices are not available to be associated with sliders).
You cannot associated sliders with stocks, conveyors, queues, ovens, conveyor outflows, queue outflows, and oven outflows.
A slider defined to show values (as shown below) displays the current value for the associated entity in the box at the bottom of the slider icon. It also indicates the minimum and maximum values to which the slider can be set.

A slider defined to not show values displays the slider only.

Model users can change the value for the associated entity by sliding the slider. If the slider shows values, they can also change the value by typing a value in the box at the bottom of the slider icon. For either type of slider, model users can navigate to the associated entity on the Model layer if the slider is defined to include the navigation arrow button.
You can also choose to define a special type of slider, called a "chained slider". A chained slider allows you to set values for two or more entities such that the total, combined value for all chained entities does not exceed 100. When you create a chained slider, you can select up to ten entities to include in the chain. For more information, see To define a chained slider.
 tool.
tool.Click the diagram to place the slider.

To specify the properties for the slider, double-click the slider icon, or right-click the slider icon and then choose Open from the menu that appears.
The Slider dialog box opens.
Use the options in the Slider dialog box to define the properties of the slider. For more information, see To define a slider.
For more information about placing and editing sliders, see Working with objects.
Notes: You cannot resize a slider manually. You can, however, make it smaller by selecting the Small Slider check box in the Slider dialog box.
You can select to have the names of the associated entities displayed next to the slider, but you cannot otherwise define or edit the slider's name.
Open the Slider dialog box for the slider that you want to define.
Note: If you want to create a chained slider, follow the procedure in To define a chained slider.
Select the entity that you want to associate with the slider.
Tip: You can also add an entity to a slider by dragging it from the Find palette.
Entities that are associated with a slider display a small slider icon ![]() to help remind you that the entity is being controlled by a slider and that the model logic may be overridden.
to help remind you that the entity is being controlled by a slider and that the model logic may be overridden.
The chained slier limits the assigned entities to a total maximum value of 100, distributed among the entities that are assigned to the chained slider. The distribution between entities is generated by the current slider settings, as determined by the model user. Frequently, you will use the generated numbers as percentages applied to a resource in your model.
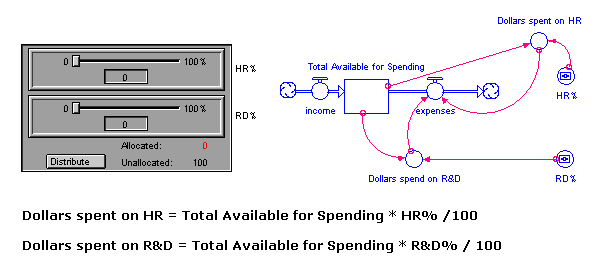
For instance, if you want to allocate company spending between Human Resources and Research & Development, apply the chained slider values (number between 0 and 100) to the Total Amount available. This will calculate the real dollar amount for each of the two departments, as illustrated below.

Note: Since a Pause in the simulation will occur during a full round of calculations (that is, all converters and flows will be calculated, and then stocks will be updated), it is advisable to use a stock as the Available Resource. Then the user can view the value of the stock on a table or numeric display during a pause to determine the adjustment to the chained slider. If placed in a converter or flow, the Available Resource value will be updated at the same time as the slider value (after the simulation is resumed).
Select the entities that you want to associate with the slider.
Note: You can select up to ten entities from the "Allowable" list.
Entities that are associated with a slider display a small slider icon ![]() to help remind you that the entity is being controlled by a slider and that the model logic may be overridden.
to help remind you that the entity is being controlled by a slider and that the model logic may be overridden.
After a slider has been defined, you can use it to set the value for the associated entity (or entities, for a chained slider). If you change the value with a slider, you can reset the entity to its original, constant value.
Note: It is possible for the value you set for a slider to be overridden by the constraints of stocks. The value you set will be overridden if the slider is assigned to:
For more information, see Flow prioritization.
Click and drag the slider in the direction of the value you want. If the slider is defined to show values, the value in the box at the bottom of the slider displays the value as you set it.
–or–
Type the value you want in the box at the bottom of the slider (the box appears only if the slider is defined to show values).
If the associated entity is defined with a constant value, when you change the value with the slider, a restore (U) button appears on the slider icon.

If the associated entity is defined by an equation on the Module layer, the  icon appears on the slider.

Click this button to turn the equation on or off.
When the equation is turned on, "eqn on" appears in the box at the bottom of the slider (if the slider is defined to show values) and you cannot edit the entity's value.

When the equation is turned off, you can edit the entity's value.
Note: The  button is available only when the model simulation is stopped. It is unavailable when the simulation is running or paused.
To restore the value to the original value, click the restore (U) button.
Tip: Use the Restore > Sliders command on the Interface and Model menus to reset all sliders with constant values to their original values.
With chained sliders, you can adjust the values of the chained entities so that the sum of all the values equals 100.
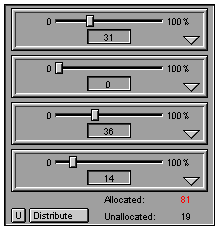
The "Allocated" and "Unallocated" values in the lower-right corner of the chained slider indicate how much of the 100 is distributed to the chained entities. "Allocated" always equals the sum of the numerical values of the entities in the chained slider. Think of these as keeping score for the chained slider total. The "Allocated" amount appears in red if the amount does not equal 100; it appears in green if it does.

The allocated amount must equal 100 in order to run the model. If it does not equal 100 and the model user tries to run the model, a message appears that asks the user to either click a Distribute button to proportionally distribute the amount to each slider, click a Navigate button to navigate to the chained slider to manually fix the problem, or cancel the run.
To specify a value for any of the sliders in the chained slider, click and drag the slider in the direction of the value you want. If the slider is defined to show values, the value in the box at the bottom of the slider displays the value as you set it.
–or–
Type the value you want in the box at the bottom of the slider (the box appears only if the slider is defined to show values).
To proportionally distribute the unallocated amount or over-allocated amount to each slider, click the Distribute button.
Note: This button appears only if the "Allocated" amount does not equal 100.
To restore the entities to their original values, click the restore (U) button.
Tip: To restore all sliders in the model to their original values, use the Restore > Sliders command on the Interface and Model menus.
If the associated entity has documentation specified for it, a documentation (?) button appears at the bottom of the slider icon.
To view the documentation for the entity, click the documentation (?) button.
The documentation appears in a pop-up window.
If the slider was defined to include a navigation button (by selecting the Show Nav Arrow check box in the Slider dialog box), a navigation ( ) button appears on the slider icon.
To navigate to the associated entity on the Model layer, click the navigation ( ) button.
The software displays the Model layer and highlights the entity icon for the associated entity.