From the Edit menu, choose Import Data.
The Import Data dialog box will open.
When you're finished setting up the import links, click OK.
For any links marked automatic, the selected data will be imported into the model.
You can use import links to bring data in from external Excel or CSV files. This greatly simplifies data organization, and also lets you have multiple datasets that can be used to run different scenarios, or to parametrize your model for different situations. There are three distinct ways to import data. The first brings in constants and graphical functions that directly change the corresponding model equations. The second brings in temporary changes to model variables for a run, or set of runs, that don't change any model equations. The thirds brings in values over time for model variables. The three two are discussed separately, but the rules for formatting the source data file, outlined in Creating Import and Export Files, are the same in all cases.
Note: You can specify import links of all types in a model, but two different import links can't come from the same source (file for csv, or file and sheet for Excel).
You can also import data from the interface using the Import Data command (see Button (Interface)). That button queries for a file when the user selects it, then imports that data following the rules of controlling variables described below. The imported values are treated like interactive changes, which means they might replace a change that a user has made in a control (user changes are always given precedence over values imported through a model link). When a model is published, there can only be one array element specified for each row or column (you can't use slices). This is because published interfaces do not know how to interpret slices. Similarly, names that are in a model, but not in the interface, will not be recognized. Only variables that are in controls, graphs or tables are recognized when published. No other information about model content is provided when interfaces are published.
From the Edit menu, choose Import Data.
The Import Data dialog box will open.
When you're finished setting up the import links, click OK.
For any links marked automatic, the selected data will be imported into the model.
Note: When data are imported automatically, no warning or error messages are given. You should verify the validity of your import file by importing manually when you set up the link. This will give you information about the import.
Note: Since the software performs an import when you set up a link, you must have created an import file with valid data formatsbefore you set up the link (and for CSV and tab delimited files, you must have saved all changes to the file) in order to import its data.
You can import constants and graphical functions to replace the values entered in your model equations. To do this, you need to create a link between the model and an Excel worksheet or a delimited text file and choose Set parameters for import behavior. The worksheet or file should contain the names of the model variables that you want to import data into, and the values that you want to import.
When you set up an import link, you can make the link dynamic, so that it's executed whenever the source file changes, or you can set it to be on demand so it will only import values when you explicitly ask it to. You can also disable links without removing them, so that you don't need to set them up again.
If you don't make the link dynamic, you'll need to perform a manual import whenever you want to update the values in the model. You can also perform a manual import on automatic links, but it'll only have an effect when you've changed values in an open Excel worksheet and haven't saved them - otherwise the values will be imported automatically when the file changes.
You can create as many import links as you want per model, but each source can only be used once.
If you're using Excel files, you can set up export and import links to use the same or different Excel files. For example, you can import values from one file into your model, and then export model run values to a different file to retain the "before" and "after" values in separate files. Or, you can import from and export to different tabs in the same file, although with automated links this will trigger another import (because the file changes). Exporting to and importing from the same sheet (or same delimited file) will not work.
Note: If your import source includes variables that are not constants or graphical functions, those variables will be ignored during the import process.
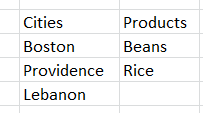
You can import array definitions by selecting this option in the import dialog. In this case the import file has to consist of a row or column of array names with the array elements listed to the right or below. For example:
 or
or 
Where both Cities and Products are the names of array dimensions in the model. Stella will replace the array dimension with the elements specified in the import source, changing the size of the dimension if necessary.
Because this process changes array definitions it may cause the model to become invalid. Using equations that are not apply to all and referencing specific dimension elements makes it more likely the import will make the model invalid.
To make importing subranges easier you may leave spaces between element names, and leave blank lines as in
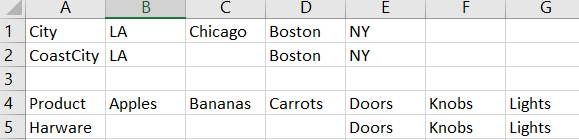
as long as the first entry does not have any spaces to the right of or below it (the determination of orientation is done by reading contiguous cells).
During this import process it may be necessary to change the names of elements to be sure they are unique or conform to naming conventions. You can use the import now feature of the Import Data dialog box to see any messages that this will generate.
Note Because this import makes such a significant change to model structure, it will not be possible to use Undo after it has been applied. It is best to apply this only after you finish editing model structure.
Note File orientation is determined by scanning for the names of dimensions. If you use an element name that matches another dimension name in the model the import may not be successful.
Note If you mark the import as Dynamic the model will be changed as you make changes to the data source - it may be easier to work with if you mark the import on demand and import only when you choose.
Importing of display names can also be done by following the dimension name by :n. For example to define 5 age groups and then label them use:

The name entry must appear after the element definitions or the names will be cleared. You do not, however, need to the element definitions - the name entries can appear in isolation as:

The number of name entries should exactly match the number of array elements, thought some can be left blank.
By selecting Control variables, rather than Set Parameters for the import behavior, you can import values that will temporarily override the value of a variable during simulation, but not make any changes to the equations. The data format for the file is the same, but you can specify any variable in the file, even variables that aren't constants. The value specified will be used in place of the computed value. For example, if the equation for x is y+1, and you've specified a value of 42 in the file, then x will be 42 no matter what value y takes on. If the variable is a graphical function, you can either specify a single value for it to take on, or a series of values to populate the graphical function. If you specify a series of values for a variable that's not a graphical function, only the first one will be used.
The steps for temporarily overriding values are also the same as those for changing constants directly, though the actions that trigger changes are slightly different. Temporary overrides are read at the beginning of each simulation, and only active import sources are used at all. So, whereas a direct import will stop changing if an import sheet is deactivated, a temporary change will just be dropped, reverting to the equation value. Because the files are all checked each time you start a simulation, you don't need to save changes in Excel files for them to be used (CSV files will still need to be saved).
You can control variables of any type. If you control a stock, it will change the initial value. If you control other variables, it will set the value they take during the entire simulation.
Note: When you simulate, no warnings or errors will be shown. To see warnings and errors, click on the test button at the bottom of the panel.
Graphicals can be controlled in two ways. The value of the variable can be controlled directly, or the graphical function can be replaced with one specified in the file. The software looks at the number of values you've supplied. If you supply 1, it will control the variable. If you supply more than one, it will use the values as y points for the graphical. If you use explicit :x, :y formatting, it will control the graphical.
In addition to setting a variable to a constant, you can also provide a set of values over time. This is somewhat more intuitive than setting up a graphical over time and importing the graphical values, and also makes it easy to set up data that can be used in Calibration.
You can import to arrays by following the formats described in Creating Import and Export Files. If you import to an array that's apply to all, using the set parameters option, but provide different values, the equations in the model will be changed to be not apply to all. If you do the opposite, supply a single value for a non apply to all equation, the equation will remain non apply to all, but all of the values will be changed to the one specified.
When controlling variables, the model equations are never changed, but all variables are treated element by element. You can, for example, set the value for a single element of an apply-to-all array in this fashion. If you specify the entire array (using no [] in the variable name), all elements will be changed regardless of whether it's an apply-to-all variable or not.