Use status indicators to provide status information about key outputs in your model. Status indicators tell model users the status of the model simulation at a glance, by displaying a color (green, yellow, or red) based on the parameters you define for the status indicator.
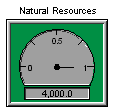
You can configure a status indicator to display as a simple lamp, or as a speedometer gauge. In either case, the indicator will light up, using green, yellow, or a flashing red color to indicate the status of the key output.
When you add a status indicator to the Interface layer of your model, you define it by associating it with an entity in your model. Then you select if the status indicator will perform as a lamp or a speedometer gauge. Finally, you specify the entity values that will turn on the status indicator at each color level (green, yellow, and red).
Notes: You can add a status indicator only on the Interface layer.
A status indicator defined as a lamp displays the color specified for the current value of the associated entity.

A status indicator defined as a speedometer gauge displays the color, indicates the current value with the speedometer needle, and (if the status indicator is defined to show values) displays the current value in a box at the bottom of the status indicator.

For status indicators defined as a speedometer gauge, model users can view the documentation (if any) for the associated entity, and navigate to the associated entity on the Model layer.
 tool.
tool.Click the diagram to place the status indicator.

To specify the properties for the status indicator, double-click the status indicator icon, or right-click the status indicator icon and then choose Open from the menu that appears.
The Status Indicator dialog box opens.
Use the options in the Status Indicator dialog box to define the properties of the status indicator. For more information, see To define a status indicator.
For more information about placing and editing status indicator, see Working with objects.
Notes: You cannot resize a status indicator, but you can select whether you want a small, medium, or large lamp size in the Status Indicator dialog box.
If you define the status indicator as a speedometer gauge, you can select to have the name of the associated entity displayed above on the status indicator. You cannot otherwise define or edit the status indicator's name.
Select the entity that you want to associate with the status indicator.
Tip: You can also add an entity to a status indicator by dragging it from the Find palette.
For speedometer-style status indicators, if the associated entity has documentation specified for it, a documentation (?) button appears at the top of the status indicator icon.
To view the documentation for the entity, click the documentation (?) button.
The documentation appears in a pop-up window.
For speedometer-style status indicators, if the status indicator was defined to include a navigation button (by selecting the Show Navigation Arrow check box in the Status Indicator dialog box), a navigation ( ) button appears on the status indicator icon.
To navigate to the associated entity on the Model layer, click the navigation ( ) button.
The software displays the Model layer and highlights the entity icon for the associated entity.
Use the following procedure to restore all status indicators to their original state.