
In order to import data from an Excel (.XLS or .XLSX) or .CSV file into a model, you need to set up the Excel or .CSV file so that the data is properly formatted. To export data from a model to an Excel or .CSV file, you can use a blank file. The export process will automatically overwrite any information in the file and set it up in the correct format.
Notes: To import data from an Excel or .CSV file, you must save the Excel or .CSV file. Unsaved
changes in a file will not be imported.
If you are sharing a model that has a persistent
import or export link to an Excel or .CSV file, create a folder called "Data"
within the folder that contains the model file. This ensures that the
connection between the model and the file stays active, regardless
of the computer that you are running the model on.
The import file format and export file format are described in detail below.
To import values from a file into a model, the file must contain the names of the variables in the model into which you want to import values, and the values that you want to import.
The variable names in the file must exactly match the variable names used in the model. You do not need to include all model variables in your file; include only the variables whose values you want to import to the model. Model variables that do not appear in the file are not affected during the import.
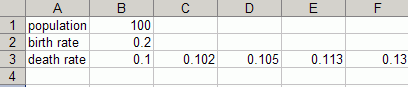
You can enter the variable names as column headings or row headings (you will indicate the format you choose when you Setting up import linksto your model). For example, the following Excel worksheet defines the initial values for population (a stock), birth rate (a converter), and death rate (a graphical function), with the variable names in the column headings:
The name of each variable appears as a column heading and the values
to import for each variable appear immediately beneath it. All values
for the graphical function (death rate),
ordered from minimum x to maximum
x, appear under the variable
heading. If the number of values in the import file is different from the number of points in the graphical function, the graphical function will be adjusted to match the number of values in the import file.
The following example shows the same data with the variables as row
headings:
Note that the data in the spreadsheet do not have to start at row 1, column A. The import process searches for names that match variables in the model and then for values below (vertical) or to the right (horizontal) of those names (again ignoring empty cells).
Any other entries that do not match model variables will be ignored.
Arrays are imported by specifying 1 dimensional array slices followed by a column (vertical) or row (horizontal) of values for that dimension. For one dimensional arrays you can leave off the [*] and just specify the name.
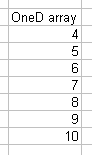
One-dimensional arrays. To import values in a file into a one-dimensional array in a model, the file must contain one column (or row) of data for the array. The column (or row) heading specifies the array name. All subsequent columns (or rows) contain the data.
The following example shows a one-dimensional array ("OneD array") set up with a column heading, and with seven specified values.

The following example shows the same array set up with a row heading.
![]()
N-dimensional arrays. To import values from a file into a higher-dimensional array in a model, the file must contain one column (or row) of data for one or more one-dimensional slices of the array. Instead of just a variable name, a variable with subscripts filled in must be used.
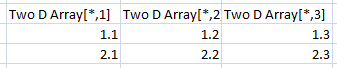
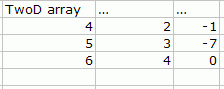
In the following example, "TwoD array" is a non apply to all 3x2 array with a horizontal link set up.
 (Horizontal)
If there are not enough values for a row, the last value will be repeated to fill it out. If there are too many values, the excess values will be ignored.
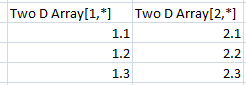
To import with a vertical link the data could be laid out a as:
 (Vertical)
In this case the data use the same orientation with the header names changed accordingly. A transpose of the first horizontal data would also work:
 (Vertical, Not Recommend)
The first two of these use the same layout of values as the Properties panel for the variable equation does and are recommended practice. The import template Stella creates use this layout.
You can use the dimension name or a * to denote the dimension over which the slice is being made. Similarly, if you use array labels you can use the label or the number to specify which slice is being used.
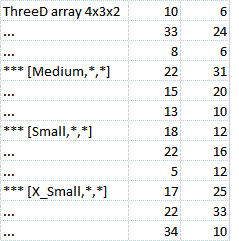
Consider a three-dimensional array on Size (Small, Medium, Large), Shape (Round, Square) and Color (Red, Green, Blue, Yellow). A horizontal link to initialize inventory would use:
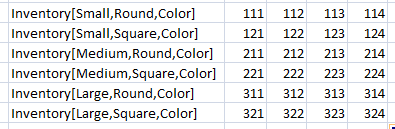
Instead of Color we could have used * with the same meaning.
You do not need to import all array slices. You can also import individual array element just by specifying the complete element entry (as in Inventory[Medium,Square,Blue]).
Graphical Functions
Because Graphical Functions take many values you need to specify the complete array element. Continuing our size shape and color example you might have:

Where demand is graphical function on TIME. Again you don't need to specify every element. Those not included will use the definitions in the model.
To import values from a file into a conveyor or queue, enter all values for the conveyor or queue as a comma-separated list in a single cell of the import file. For conveyors, you specify one value per unit time in the conveyor. For queues, you specify one value per element in the queue.
The following example shows the format for specifying three values to import for a conveyor.
![]()
Earlier version of iThink and Stella used a different convention when importing data. File formatted in this manner as still supported in Version 10.1, but will not be in future versions. These formats are not recommended because they are both inflexible and confusing.The below documentation is intended to aid conversion of legacy formats to the array slice identification described above.
To import values from a file into a model, the file must contain the names of the entities in the model into which you want to import values, and the values that you want to import.
The entity names in the file must exactly match the entity names used in the model. You do not need to include all model entities in your file; include only the entities whose values you want to import to the model. Model entities that do not appear in the file are not affected during the import.
Note: If any of the entities in the file do not match those in the model, you will receive a warning message during the import to tell you what data could not be imported.
You can enter the entity names as column headings or row headings (you will indicate the format you choose when you set up the link to your model). For example, the following Excel worksheet defines the initial values for population (a stock), birth rate (a converter), and death rate (a graphical function), with the entity names in the column headings:

The name of each entity appears as a column heading and the values
to import for each entity appear immediately beneath it. All values
for the graphical function (death rate),
ordered from minimum x to maximum
x, appear under the entity
heading. If the number of values in the import file is different from the number of points in the graphical function, the graphical function will be adjusted to match the number of values in the import file.
The following example shows the same data with the entities as row
headings:

Note that the data in the spreadsheet do not have to start at row 1, column A. The import process searches the first 20 rows and 10 columns (200 cells) for a entity name, so you can begin entering data anywhere within that area. This allows you to enter header data or other documentation in the file that will not affect the import process. You can also enter descriptive information between columns (if you are using a column format) or between rows (if you are using a row format).
Between each entity, you can have up to five columns (or rows, if you are using row format) that have a blank header line. Data can appear in any other row (or column, in row format) than the header row and these columns (or rows) will be ignored during the import.
One-dimensional arrays. To import values in a file into a one-dimensional array in a model, the file must contain one column (or row) of data for the array. The column (or row) heading specifies the array name. All subsequent columns (or rows) contain the data.
The following example shows a one-dimensional array ("OneD array") set up with a column heading, and with seven specified values.
The following example shows the same array set up with a row heading.
![]()
Two-dimensional arrays. To import values from a file into a two-dimensional array in a model, the file must contain more than one column (or row) of data for the array. The first column (or row) specifies the array name. All subsequent columns or rows for the array contain an ellipsis ("...").
In the following example, there are three entities for the array "TwoD array", set up with column headings. The file provides three values for each entity.
If there are not enough values for the array, the last value will be repeated to fill it out. If there are too many values, the excess values will be ignored.
Note: For two-dimensional arrays,
the data in import file rows always map to rows in the model array, and the
data in import file columns always map to columns in the model array, regardless
of whether there are row headings or column headings in the file.
The following example shows the same data as in the "TwoD array"
example above, with row headings rather than column headings. Notice that
the data is in the same order in both examples.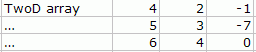
N-dimensional arrays. To import values from a file into an n-dimensional array in a model, the file must contain data for each two-dimensional slice of the array. The first column (or row) specifies the array name. All subsequent columns or rows for the two-dimensional slice contain an ellipsis ("..."). To indicate the start of a new two-dimensional slice use "***" in the first column (or row). Optional labels or text appended to the asterisks can be used to help identify the array slice.
In the following three-dimensional array example, there are four two-dimensional array slices, set up with row headings.
One-dimensional graphical functions. Format the data in the same way as you would for a two-dimensional array, with an ellipsis ("...") in subsequent rows or columns. For one-dimensional graphical functions, however, your specification of row vs. column headings determines how the values are read into the graphical function.
The following example shows how you would format the import file for a one-dimensional graphical function (called "OneD gf array") with four elements (in column headings).
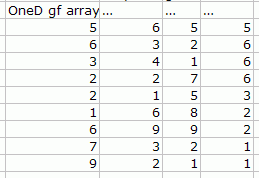
If there are not enough values for the elements, the last value will be repeated to fill it out. If there are too many values, the excess values will be ignored.
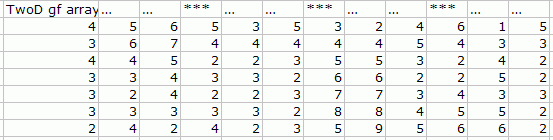
Two-dimensional graphical functions. To import values from a file into a two-dimensional graphical function, format the values in row-major order (values are imported from the first row, moving from left to right, then from the second row, left to right, and so on). Succeeding columns in a row start with an ellipsis ("..."). To indicate the start of a new row, use "***" in the first column of the row.
The following example shows the format for a 4x3 array (called "TwoD gf array") of graphical functions (1 column for each cell in row-major order).
If the One set of values option is selected as the interval for the export link, data exported from the model to the export file appear in the same format as described for the import file (not Legacy input format). This allows you to use the exported values as import values at another time.
If one of the other interval options is selected for the export link, data exported from the model is in the same format as table output. If you are using the One set of values option with a table, do not include more than one element from each array as every occurrence of an array element will cause the entire array to be exported.
As with the import file, you decide whether you want the entities to be listed as column headings or as row headings when you set up the export link.
When you export data, the contents of the export file are always erased before the export starts. Any text or formatting specified in the worksheet is lost when the export happens.
 See Also