On the Array panel, select the Arrayed check box.
–or–
In the "Available Dimensions" list, select the dimensions that you want to assign to the entity, and then either double-click it or drag them to the "Chosen Dimensions" list. The Arrayed check box is selected automatically.
Note: When you transform a stock into an arrayed stock, its attached flows are automatically arrayed for you.
If you have not already assigned dimensions to the arrayed entity, in the "Available Dimensions" list, select the dimensions that you want to assign to the entity, and then either double-click it or drag them to the "Chosen Dimensions" list.
Note: If you have not yet created a dimension you want to assign to the entity, click the Array Editor button. For more information about creating array dimensions, see Working with array dimensions and elements.
In the "Equation" section of the Equation panel, use the Apply to All check box to specify whether you are defining one initial value/equation for all elements, or if you are defining a separate initial value/equation for each element:
- To define one initial value/equation for all elements in the dimensions, select the Apply to All check box.
- To define a separate initial value/equation for each element in the dimensions, clear the Apply to All check box. A table appears in the Equation box and displays cells so that you can enter the initial values/equations for up to two dimensions at a time.
In the Equation box, type the initial value/equation for the elements:
- If the Apply to All check box is selected, the initial value/equation you enter in the Equation box applies to all elements for the array.
- If the Apply to All check box is not selected, you need to type an initial value/equation for each element. For more information, see To define a separate equation for each element.
Notes: If you use an arrayed entity in an equation, the Choose Subscript dialog box opens when you add the entity to the equation so that you can select the dimension or elements to use in the equation (if the Apply To All check box is selected, you select the dimension; if the Apply To All check box is cleared, you select the elements).
The selected dimension or element names appear in square brackets in the equation. For dimensions, the software automatically aligns corresponding elements in the equation definition" (for example, if the Dimension is "City" and the elements are Boston, Chicago, etc., the software aligns Boston to Boston, Chicago to Chicago, etc).
To use an arrayed entity in the apply-to-all equation of another arrayed entity, the dimensions of the first entity must be a subset of the dimensions of the second entity (in any order). For example, you can use A[X] in the equation for B[X, Y], and you can use A[X, Z] the equation for B[X, Y, Z] because, in both cases, all of the dimensions in array A are also in array B. Note that you can also use A[Z] in the equation for B[X], but only in a case where you do not refer directly to a dimension name. In this case, for example, you can use SUM(A) or A[1] in the equation for array B.
 in the upper-right corner of the panel to save and apply your changes.
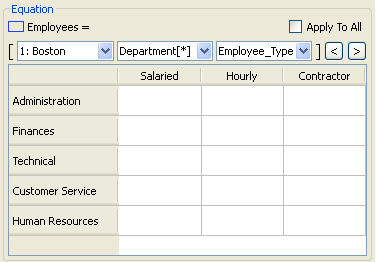
 button to display the next combination of elements and dimensions.
 button.
 See Also