The shape tool lets you place a geometric shape on the page. It is only available on the interface.
You can specify which shape to use, the outline style and color and the fill color and opacity for each shape.
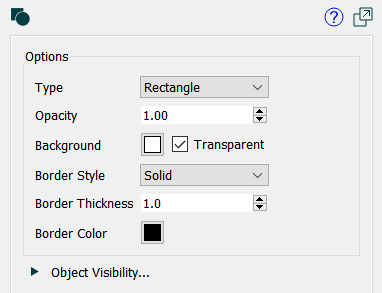
Type specifies the type of shape to use:
Ellipse can have both an outline and a fill. Use opacity of 0 to show only the outline. Select and resize to change the size and oval axis. When the width and height are the same an oval is a circle.
Horizontal Line uses only the outline. It creates a one dimensional separator between the content above and below it.
Rectangle can have both an outline and a fill. Use opacity of 0 to show only the outline. Select and resize to change the size and relative width and height. When the width and height are the same a rectangle is a square.
Vertical Line uses only the outline. It creates a one dimensional separator between the content to the left and right of it.
Opacity specifies how much will show through the background (ellipse and rectangle only). At the default of opacity of 0, the background is not visible. Use 1 to fill with a solid color and values in between to partially cover anything below the shape.
Background specifies the background color to use for the interior of the shape (ellipse and rectangle only). Click on the color button to select a color.
Border Style specifies the style used in drawing the border for a rectangle or ellipse or the entire object for one of the lines. Choose either Solid or None. If you select None, the remaining settings won't matter.
Tip: When you first place a shape it will have a solid outline.
Border Thickness lets you specify how thick, in points, you want the border around the shape (or the shape itself for the two line types) to be. This has an effect only when you've selected Solid for the Style.
Border Color lets you specify the color for the outline. Click on the displayed color button to select a color. This has an effect only when you've selected Solid for the Style.
Note Shapes will always be drawn on top of all other objects on the interface unless explicitly sent to the back (or something else is explicitly sent to the front).