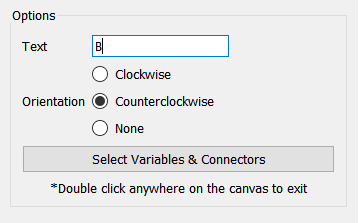
Use the Loop Label Properties panel to set up the loop variables and format the text that appears in a Loop Labels.

This lets you set the text and orientation.
Text is the text that will appear inside of the loop label. Common values are R, B, +, or -. Loop labels are also often numbered (e.g. R7). There is no restriction on the length of the text, but if the text does not fix in the loop label area only a part of it will be displayed.
Orientation determines the direction that the arrow around the text will go. The choices are Clockwise  , Counterclockwise
  , and None
  . Click on one to select it. None can be useful when you are highlighting main chains or other pieces of structure that are not loops.
Use this button to select which variables and connectors will be highlighted when the mouse cursor passes over the loop label.
Click on the button, then click on the objects you want highlighted. If something is already highlighted clicking will take the highlight away. Once you are satisfied with the objects you have highlighted double click on a blank part of the model to exit the highlighting mode.
Note If you do not highlight variables, the loop will not highlight, but the label will still be clear.
Note You can also select a subset of the variables or connectors to achieve a special effect such as highlighting the links that enable the loop or highlighting a main chain.
Use theStyles Tab (![]() ) to set the font on the displayed label as well as the color of the arrow.
) to set the font on the displayed label as well as the color of the arrow.
Loop labels will display on the interface and will highlight when the mouse moves over them. Since you can also highlight variables on the interface independently, those highlights will be dropped when highlighting a loop. This can be a bit confusing so it is probably best not to mix loop highlighting with other variable highlighting on the interface.