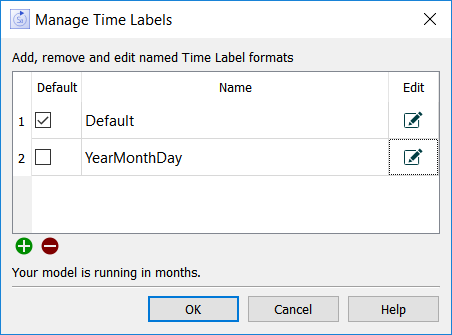
Use this dialog to add and edit different time labels to enhance their display on graphs and tables. It is opened from the Model Settings Properties Panel.

Default specifies which of the labels will be used by default. The default label will be used in newly created graphs and tables as well as in the Results Panel and Causal Lens. There is always one and only one default, so checking one will uncheck others.
Name is the name of the Time Label. New models start with a Time Label named Default. You can change that name.
Edit opens the Manage Time Labels dialog box for the row. This dialog lets you control the way the Time Label works and specify its name.
Use ![]() to add a new Time Label (the Manage Time Labels dialog box will open). Use
to add a new Time Label (the Manage Time Labels dialog box will open). Use ![]() to delete the currently selected Time Label. You can not delete the default time label.
to delete the currently selected Time Label. You can not delete the default time label.
The dialog will contain a line such as "Your model is running in months" just below the add and remove buttons. This will say years, quarters, months, weeks, days, hours, or seconds. It is important that this is properly set so that the Time Labels you create can properly map model time to the display format that you choose for time.
If you have specified other units for time you might see:
Your model is using custom time units. We will treat them as months till you create an alias. See help for more information
This happens because it was not possible to reduce the model's time units to years, quarters, months, weeks, days, hours or seconds. But suppose you have selected model units Hora. In this case hours would be appropriate. To make this happen you will need to open the Unit Editor dialog box from the Model menu and add Hora as a unit with equation Hours. For example:

You can add the units to My Unit Definitions or to Model Specific. Both will allow the software to recognize that Horas is the equivalent of Hours.