Use the status indicator to display the status of a variable using colors (green, yellow, and red). The Status indicator appears as a circle, with the color dependent on the value of the associated variable. The status indicator is only available on the interface.
Select Status Indicator ![]() from the Interface Build toolbar, and click on the page at the location you want it to appear. After placing it, you can size it by dragging its sizing handles or using the Properties panel.
from the Interface Build toolbar, and click on the page at the location you want it to appear. After placing it, you can size it by dragging its sizing handles or using the Properties panel.

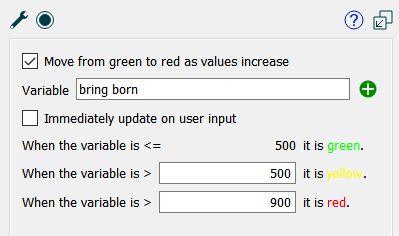
Move from green to red as value increases, if checked, indicates that the indicator will transition from green to yellow to red as the value of the selected variable increases. If it's not checked, it will transition as the value decreases. The relational symbol preceding hte displayed and editable values make this explicit.
Variable names the variable to be used as the basis for displaying status. Click on the ![]() button to select from the Find dialog, or type in a name and it will autocomplete.
button to select from the Find dialog, or type in a name and it will autocomplete.
Immediately update on user input, if checked, will use the vlaue that will be computed if the model is paused. If not checked then during a puse the vlaue from the previous DT (Save Interval) will be shown for flows and converters.
When the variable is <= shows the color that will be displayed when the variable has a value less than that shown. You can't edit that value, but it matches the value you enter below. If the first check box is not checked, <=is replaced by >= in the label and the meaning.
When the variable is > than lets you specify the value at which the color will transition from the first to the second color shown. When the variable exceeds this value, but hasn't yet reached the next value shown, the color at the right will be displayed. If the first check box isn't checked, >is replaced by < in the label and the meaning.
The second When the variable is > than lets you specify the value at which the color will transition from the second to the third color shown. When the variable exceeds this value, the color at the right will be displayed. If the first check box isn't checked, >is replaced by < in the label and the meaning.
Note: You can skip the display of any of the colors by the appropriate choice of the values you enter. To skip the first color, set the first value you enter to a very small number, such as -1.0E30. To skip the second color, set the two values entered to be the same. To skip the third color, set the second value to a large number, such as 1E30. If the first check box isn't checked, use a large number to skip the first and small number to skip the last.