Stella Modes, Views, and Panels
From the model window, you can create and edit the model, run it, and explore the results. From the interface window you can create, edit, and run the interface.
Stella Modes
In the model window
The Stella model window has two modes. You can switch between these modes whenever you want. Sometimes, the mode changes automatically. Here's how it works:
-
 Edit mode - in this mode, you add building blocks, arrange them, format them, and edit their properties. Click the Edit button to switch to this mode.
-
 Explore mode - in this mode, you explore the results of a single run of a simulation. Click the Explore button to switch to this mode.
- When you run a simulation, the software switches to Explore mode.
- When you click a variable in Explore mode, and the Results panel isn't open, the software switches to Edit mode. If the Results panel is open, data for the selected variable loads into the Results panel.
- When you double-click a variable in Explore mode, you'll switch to Edit mode.
In the interface window
In addition to Edit and Experiment, you can select Presentation mode on the Stella interface window. Here's how it works:
-
Edit mode - in this mode, you add objects, arrange them, format them, and edit their properties. Click the Edit button to switch to this mode, or hit the Esc key if you're in Presentation mode.
-
 Experiment mode - in this mode, you can experiment with and test the interface. Both the Run toolbar and the buttons and controls on the interface will be active. Other than the availability of the Run toolbar, the behavior will be the same as that in Presentation mode.
-
 Presentation mode full screen - in this mode, the interface will show what you're working on, with nothing else on the screen. The interaction with the interface will be the same as it is when the model is published, except that you can use the PgUp and PgDn keys to move between pages on the interface. No editing controls will be displayed. Press Esc to return to editing.
-
 Presentation mode windowed - in this mode the interface will show what you're working on, in a window the same size as the current window. The interaction with the interface will be the same as it is when the model is published, except that you can use the PgUp and PgDn keys to move between pages on the interface. No editing controls will be displayed. Press Esc to return to editing.
- When you run a simulation from the Run toolbar, the window switches to Experiment mode.
- When you click a button in Experiment mode, the button action is taken.
- When you double-click an object (including buttons) in Experiment mode, you'll be switched to Edit mode.
- When you double-click an object in Presentation mode, nothing will happen. Use the Esc key to exit to Edit mode.
Note: You can't switch out of Edit mode if your model has errors that would prevent simulating.
Stella Views (model window)
There are two Stella views. You can switch between them by clicking on the down arrow next to the displayed view in the Mode Toolbar, or by clicking on the icon at the bottom of one of the Property Panels.
-
 Map view - use this view to lay out the model diagram. No indications of model validity will be visible.
-
 Model view - use this view to complete model equations and make your model simulate. Validity indicators will appear on all incomplete variables and a dropdown list of errors or warnings will display on the Run Toolbar.
On the interface model view, objects display as they would in Map view.
Stella Panels
Setting values and attributes is mostly done through persistent panels, though some dialogs remain. To work with an object in a panel, you click on the object. Then the panel will display the attributes associated with that object - whether it be equations, appearance or actions.
Panel Geometry
Panel entries are designed to fit in the least amount of space possible, but there are often a large number of things that can be set. To keep the size manageable, many of the lesser used options are collapsed into just titles. For example, graphs give you control over the fonts used for titles, legends and axis labels. By default, those options are collapsed:
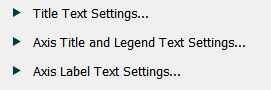
To look at the options for a specific entry simply click on the  arrow next to the label and the section will expand:
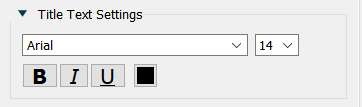
You can then collapse the content using the  arrow at the top of the section.
Most of the documentation will use screen shots with the sections expanded so that all options can be discussed.
Properties panel
In Edit mode, you can view the properties of a selected object in the Properties panel:
- Variables (model window)
- Map view - view the model framework without the need to think about simulation-related details. You can add building blocks, move them around, and format the appearance of the object and its label.
- Model view - view and edit information related to the simulation. In this view, you can do everything you can do in Map view, but you can also view and edit all the object attributes necessary to create the simulation.
- Model and Interface - display properties for the model and interface, including simulation specs and default fonts.
- Other Objects display properties available to them. These vary by object and whether you're working in the model or interface windows.
- Multiple Objects, when selected, will display content on the properties panel common to all of them.
Pages panel (interface)
The pages panel which, by default, docks on the left, allows you to navigate the interface pages and stories. See Pages Panel (Interface) for more detail.
Results panel (model)
When the Results panel is active in either Edit or Explore mode, you can see data from the selected object in the Results panel. See Results Panel.
- Select an object to load the most recent data into the Results panel.
Causal Lens (model)
Display a variable and the variables that it impacts for all the current runs. See Causal Lens™.
Parameter Control
Display a list of variables that have had their values changed relative to their equations, and change their values temporarily. See Parameter Control Panel .
Message Log
Show issues uncovered when opening the model, simulation messages for range and error checking, and optimization messages for progress and results. See Message Log.